Have you ever thought of saving HTML form responses to a Google Sheets document? Yes, email alerts for form submissions are cool, but how about we have them stored in a Google Sheet which will update in real-time? How cool would that be?  Well, this is exactly what we are going to do in today’s tutorial. So sit back, relax and get ready to do some typing as we go through the guide together. But wait a minute, before we do, let us take a look at What could be the use cases for saving form responses in Google Sheets?
Why save Form Entries in Google Sheets?
Well, there are a lot of reasons as to why you might wanna do this, some of them are:
- When you have a static website:
If you are just starting out with Web Development and are not familiar with backend languages like PHP, this might be a good way to save form responses. Or if you are a fan of services like Cloudflare Pages or Netlify, then you might just have your business website hosted on these platforms but need a way to make HTML forms work, well Google Sheets got your back. - Email List:
Another good use case could be when you are sending out emails to your users or form entries, you can easily copy all the emails directly from Sheets. - Real-Time Response Analysis: Maybe you are looking to share a form with a group of people and want to see responses for all of them in real-time to maybe compare them, in that case, Google Sheets would be helpful since you can take a look at all of them at once.
Your use case scenario can be any of the above, maybe even something else, or maybe you just want to learn it for fun. Whatever it might be, let us take a look at how you can implement it.
How to save HTML Form Responses to a Google Sheet
It’s quick, easy and simple, here are the steps that you need to follow:
Part 1: Setting up the Spreadsheet
- First of all, go to Google Sheets and create a new Sheet, you can name your file anything. I am going to call it HTML Form Responses.
- Now, let’s create headers for the columns or fields which we would have in our form, let’s also add a Date as the first column.
For this example, I am creating a simple form with First & Last Name, Email and Query. Here’s what my spreadsheet header looks like: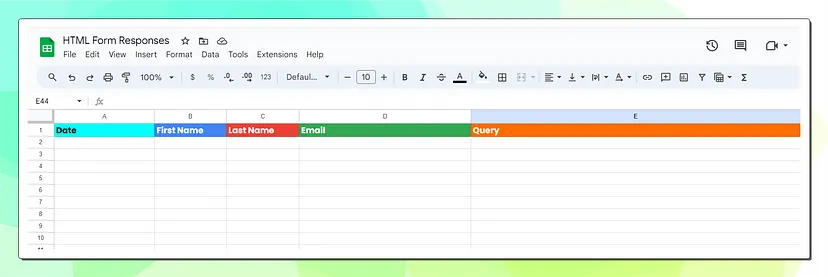
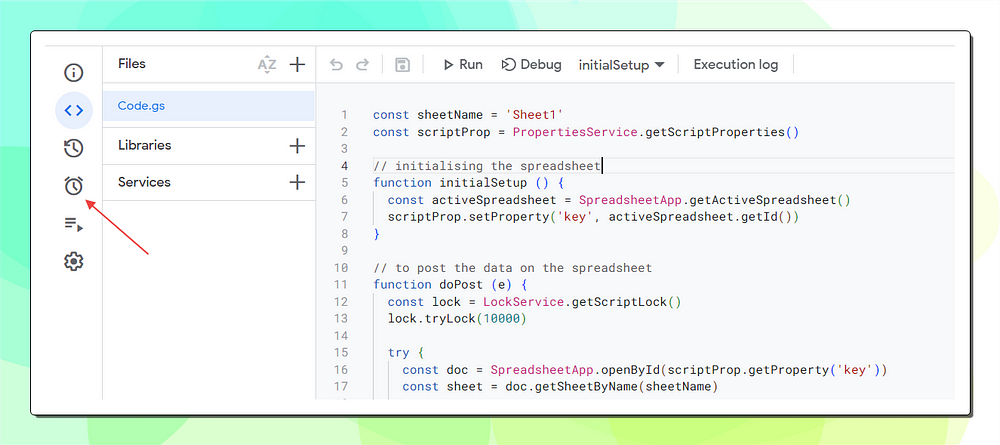
- Once that’s done, go to Extensions -> Apps Script. Let’s call this script something like ‘Capturing Form Enquiries’.
- Simply copy the following code and paste it in the script:
const sheetName = 'Sheet1'
const scriptProp = PropertiesService.getScriptProperties()

// initialising the spreadsheet
function initialSetup () {
  const activeSpreadsheet = SpreadsheetApp.getActiveSpreadsheet()
  scriptProp.setProperty('key', activeSpreadsheet.getId())
}

// to post the data on the spreadsheet
function doPost (e) {
  const lock = LockService.getScriptLock()
  lock.tryLock(10000)

  try {
    const doc = SpreadsheetApp.openById(scriptProp.getProperty('key'))
    const sheet = doc.getSheetByName(sheetName)

    const headers = sheet.getRange(1, 1, 1, sheet.getLastColumn()).getValues()[0]
    const nextRow = sheet.getLastRow() + 1

    const newRow = headers.map(function(header) {
      // initialize the date
      return header === 'Date' ? new Date() : e.parameter[header]
    })

    sheet.getRange(nextRow, 1, 1, newRow.length).setValues([newRow])

    return ContentService
      .createTextOutput(JSON.stringify({ 'result': 'success', 'row': nextRow }))
      .setMimeType(ContentService.MimeType.JSON)
  }

  catch (e) {
    return ContentService
      .createTextOutput(JSON.stringify({ 'result': 'error', 'error': e }))
      .setMimeType(ContentService.MimeType.JSON)
  }

  finally {
    lock.releaseLock()
  }
}
- Once done, press Ctrl + S to save the script.
- Now, let’s run the script, click on the Run button.
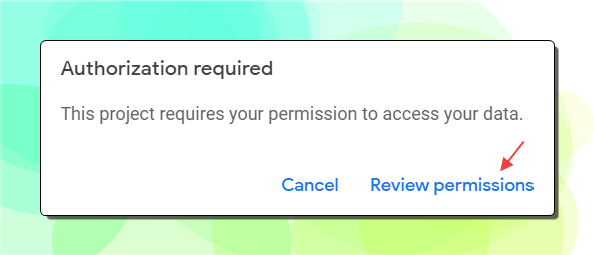
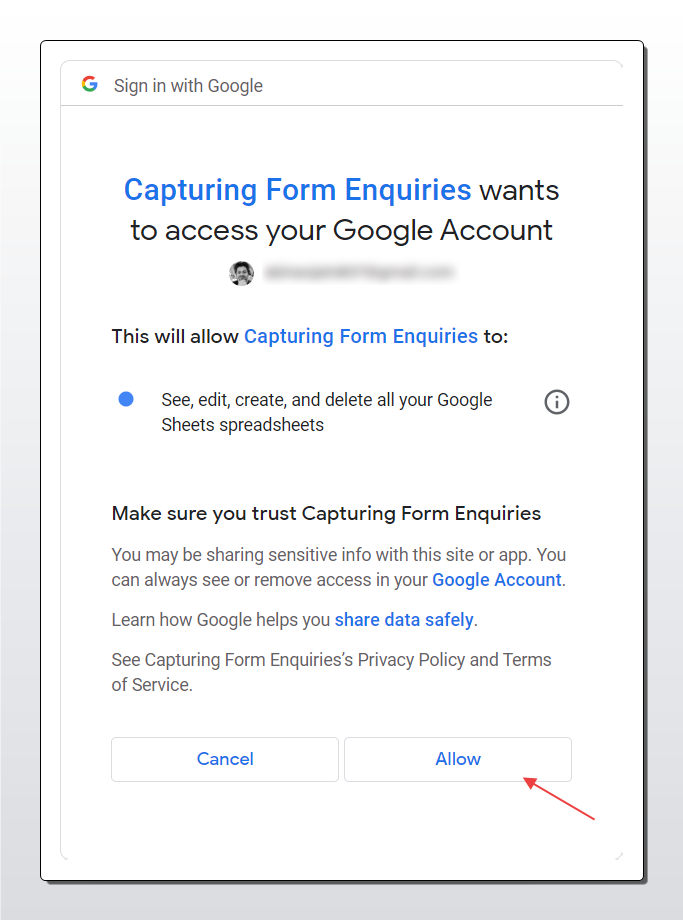
- You should get a popup which asks you to review permissions. Click on Review Permissions.
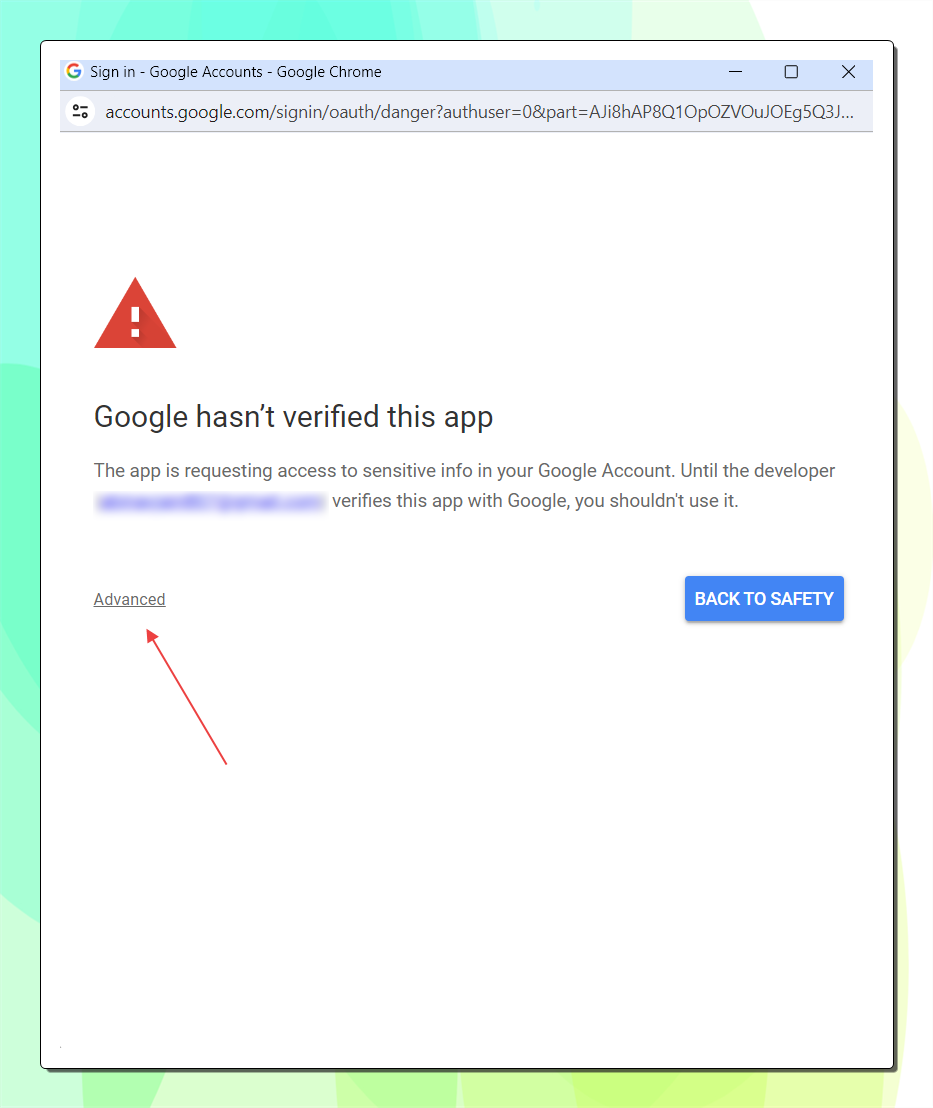
- In the popup, click on Advanced and Go to Capturing Form Enquiries (unsafe).
- On the next screen, allow the function you just created to Edit, View and Modify your spreadsheets so you can use it to capture data.
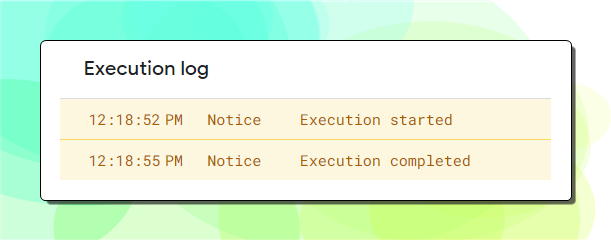
- Once that’s done you should see a message saying Execution completed in the log like this:
- Now, let’s add triggers to make our script work. Click on triggers on the sdiebar.
- Click on Add Trigger.
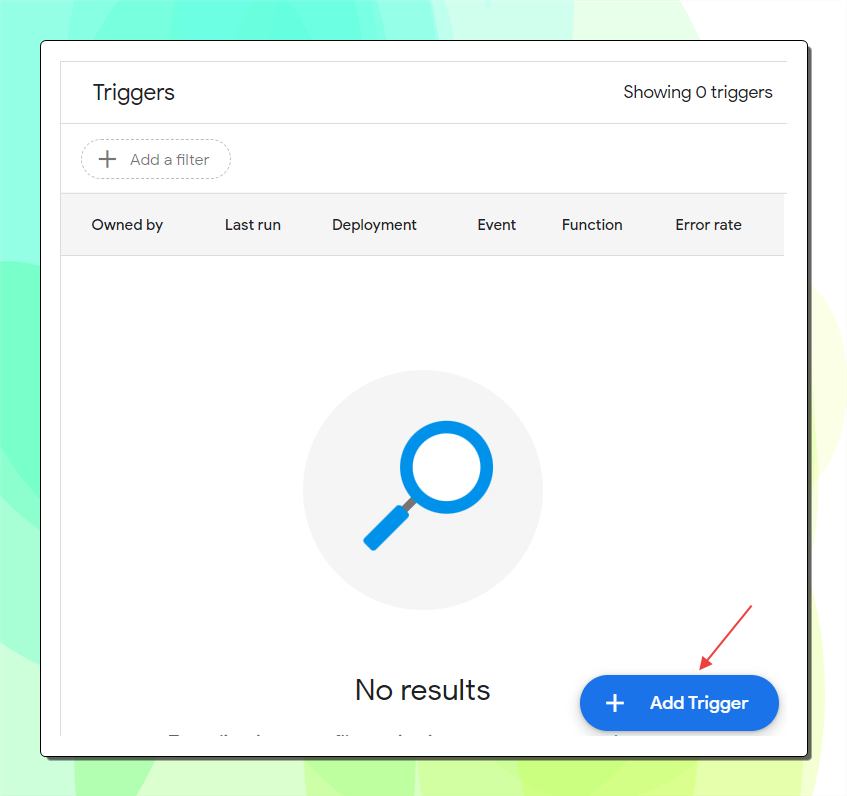
- Now, set the options as following in the popup window:
Choose which function to run: doPost
Choose which deployment should run: Head
Select event source: From spreadsheet
Select event type: On form submit
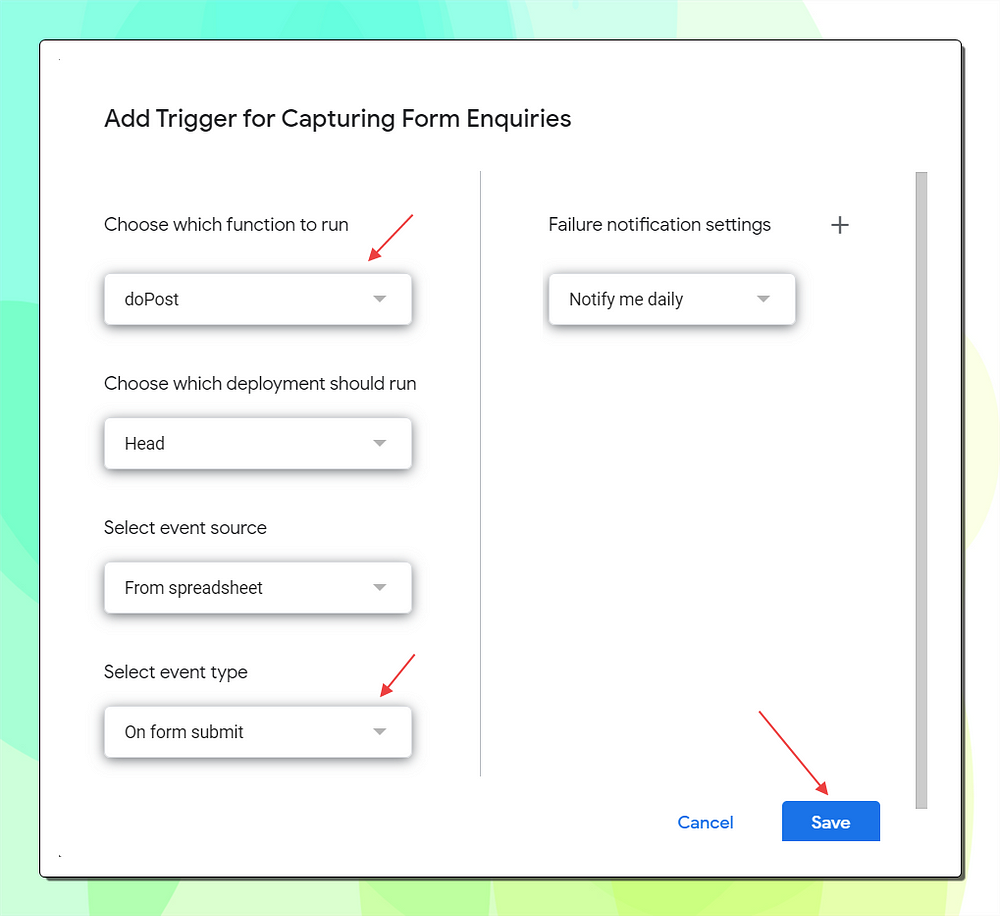
- Once done, click on Save button.
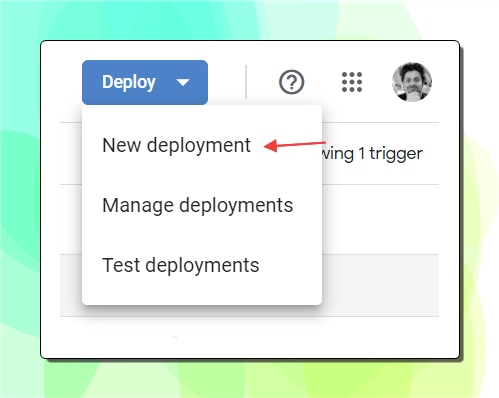
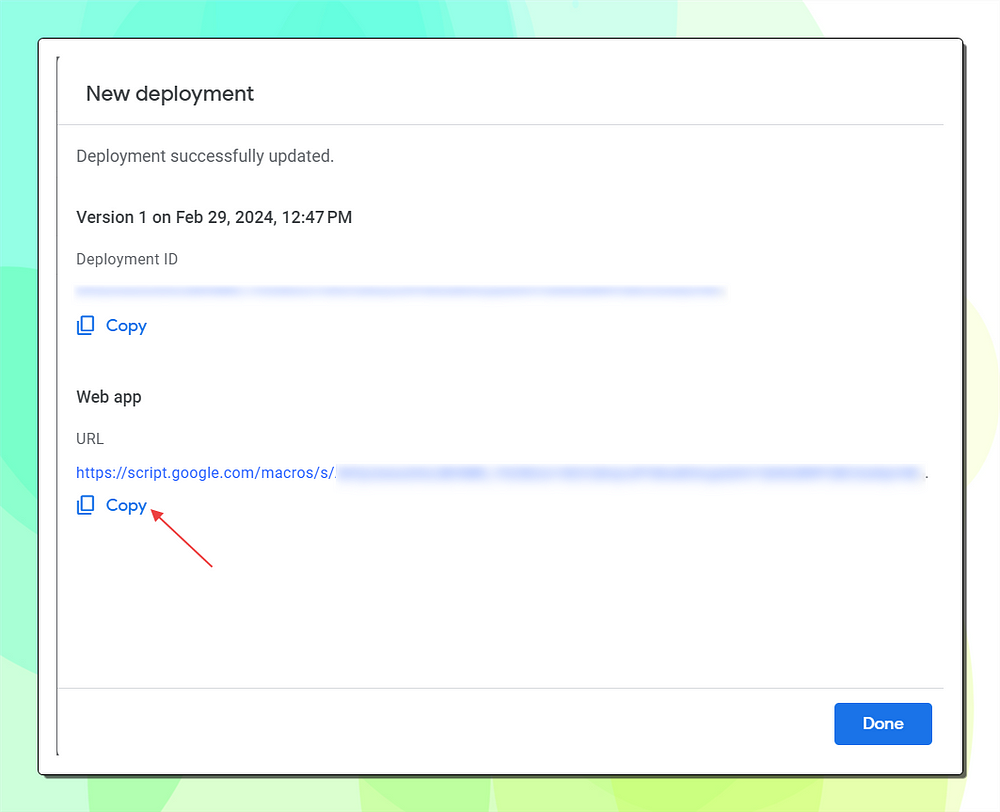
Note: If you get another warning for permissions, do the same thing, Go to Advanced > Go to Capturing Form Enquiries (unsafe) and allow permissions. - Now, it’s time to deploy the script. Click on Deploy > New Deployment.
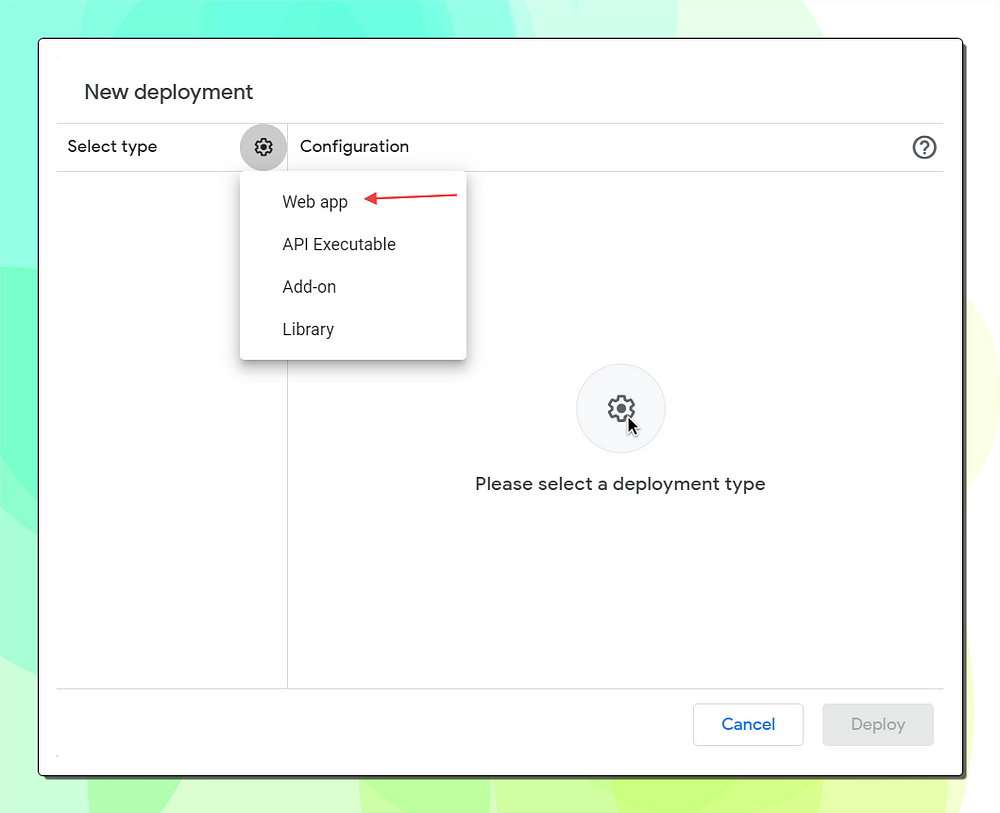
- On the popup window, click on Select Type and choose Web App.
- Write a description to describe what this script is for and change Who has Access to Anyone. This is extremely important to make this work. Since you need this function to get executed on your website without any authentication.
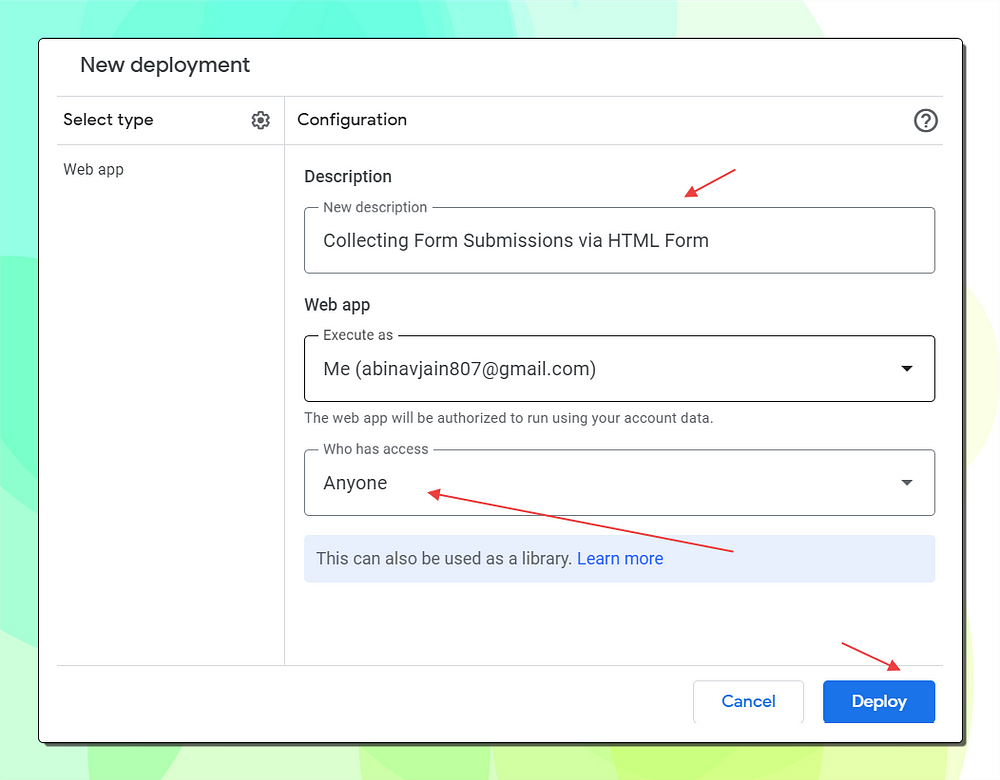
- Once done, click on Deploy. You should now get a Web App URL. Copy it somewhere since we would need it when building HTML Form.
Part 2: Building HTML Form
Now, when you have the spreadsheet, let’s create the HTML form for the users. Here’s the simple html form code:
<form
  method="POST"
  action="YOUR_WEBAPP_URL" >
  <input name="First Name" type="text" placeholder="First Name" required >
  <input name="Last Name" type="text" placeholder="Last Name" required>
  <input name="Email" type="email" placeholder="Email" required>
  <textarea name="Query" placeholder="Query" required>
  <button type="submit">Send</button>
</form>
Make sure:
- Replace YOUR_WEBAPP_URL with the url you copied earlier.
- Extremely Important: The fields in your form can be in any order, but make sure that the attribute ‘name=’ value matches to that of the header in spreadsheet. It is CASE SENSITIVE.
For instance, if your spreadsheet header says ‘First Name’ the HTML input field’s name attribute should be, name=”First Name” as well, it won’t work if its anything else like “first name’ or “firstname”.
Once done, simply test the form in browser to see it working.
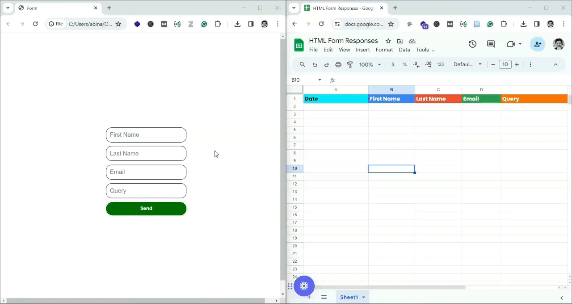
There you go, now you can use this form literally anywhere on the Internet and it would work. That was a quick and easy way to capture and organise HTML form enquiries in Google Sheets.
Stuck somewhere or having issues? Feel free to comment them down below and I will try my best to help you out.